Hyper-V USB Passthrough using USB Redirector
USB Redirector is a software that allows passthrough virtually any USB devices to Hyper-V virtual machine: USB dongle, USB storage, USB smartcard, USB printer, USB scanner, USB webcam, etc. It can redirect USB devices that physically attached to Hyper-V host or any other computer in your LAN or Internet.
USB support in Hyper-V is a major concern for many users who want use USB devices in their virtual machines. The lack of such feature greatly limits useability for solutions based on Hyper-V. USB Redirector provides is an easy-to-use, scalable and reliable way to resolve this problem!
How to install USB Redirector on Hyper-V Server
Microsoft Hyper-V Server is based on Windows Server Core and does not provide a user interface except command-line, thus it might be tricky task to install third-party software like USB Redirector. Below we will provide instructions on how to install USB Redirector via the command-line interface of Hyper-V Server.
So, let's start! At first you should logon to your Hyper-V Server locally or through Remote Desktop and switch to console window:

Installing from website (Windows Server 2016 or newer)
For Windows Server 2016 or newer, execute the following command in console. It will automatically download, extract and start the USB Redirector installer:
powershell -command "& { Invoke-Webrequest https://www.incentivespro.com/usb-redirector.zip -OutFile $env:TEMP\usb-redirector.zip -UseBasicParsing; Expand-Archive $env:TEMP\usb-redirector.zip -DestinationPath $env:TEMP -Force; start $env:TEMP\usbredirector-setup.exe }"
For older servers, please use one of the other methods below.
Installing from USB flash
Download USB Redirector package and put the usbredirector-setup.exe file from the package to a USB Flash. Then insert the USB Flash into USB port on your Hyper-V Server and execute the following command in console:
E:\usbredirector-setup.exe
Where E: is your USB Flash drive letter. If you do not know exactly which letter is used for your USB Flash, you can try several letters starting from A or type wmic logicaldisk get caption,description command to list all drives.
Installing from CD or DVD
Download USB Redirector package and use your favorite disk burning tool to burn the usbredirector-setup.exe file from the package to a disk. Insert this disk into CD/DVD drive on your Hyper-V Server and execute the following command in console:
D:\usbredirector-setup.exe
Where D: is your CD/DVD drive letter. If you do not know exactly what is your CD/DVD drive letter, you can try several letters starting from A or type wmic logicaldisk get caption,description command to display all drives.
Installing from network share
Download USB Redirector package and put usbredirector-setup.exe file from the package to a shared folder on your computer. Then connect this share as network drive on Hyper-V Server with help of NET USE command:
NET USE X: \\MY-WORK-PC\Share
assuming that "\\MY-WORK-PC\Share" is a shared folder path in your LAN. This command will attach your shared folder as a network drive X: on Hyper-V Server. You may be prompted to enter a password to access the share.
To start installer, type the folowing command in console and press Enter:
X:\usbredirector-setup.exe
Configuring Windows Firewall
USB Redirector will automatically configure Windows Firewall during installation. If, for any reason, it did not do this, you may use the following command on Hyper-V host to create the necessary firewall rules:
netsh advfirewall firewall add rule name="Allow incoming USB Redirector connections" dir=in protocol=tcp localport=32032 action=allow
This command will allow USB Redirector to accept connections from virtual machines. For more advanced firewall configuration see Netsh command documentation.
How to open USB Redirector and share USB devices
After you finished installing USB Redirector, type the following command in the console to open the program:
"C:\Program Files\USB Redirector\usbredirector.exe"
This command assumes that USB redirector was installed at a default location (C:\Program Files\USB Redirector). If you installed into another directory, please specify it instead.
To make a USB device available to virtual machine, you need to share it. Simpy select the device in USB Redirector and click Share button:
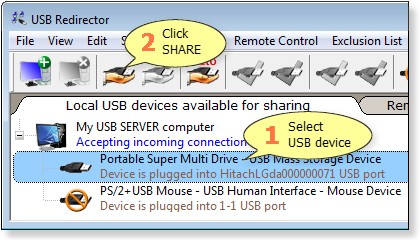
Please check USB Redirector Step-by-step Guide for more detailed instructions.
How to install USB Redirector Client on virtual machine
Installation of USB Redirector Client on a virtual machine is no different from installing it on a normal computer. Simply Download USB Redirector Client on VM and start the installer.
What's Next
You can try USB Redirector for free during 15 days! Please see USB Redirector page for more information on how to use the program or refer to its User Manual. If you got any questions, don't hesitate to contact us, we are here to help!
Download Free Trial
Fully-functional during 15 days